At RoundPie App, we always strive to make our users’ lives easier and our product better. In many cases, our users are the main catalysts of our growth and development. And we are very grateful for that!
Recently we have been approached by one of our clients asking if it would be technically possible to connect his Philips Hue smart lamps to RoundPie.

And… of course, we have accepted the challenge. We are now very happy to introduce our new integration featuring Philips Hue lamps – smart LED lights that offer a mix of colors and lighting effects that one can control remotely.
This integration allows you to sync your Philips Hue lights with your RoundPie workflow. With only a few clicks you can automate the change of your lamp's color or brightness to create a perfect working environment.
For example, set your Philips Hue lights to a brighter mode while the RoundPie timer is on and choose a doomed light mode for your breaks, or try any other color or brightness combinations that suit you best.
If you are using Philips Hue standalone lights (not a primary light source), you can place them next to your workstation and set them to a red/green (or any other color combination) mode. With a red light on while you are working and green light on during your breaks – they will inform people around you on whether you can be approached or not. This will allow you to stay more focused with fewer distractions.
How do I make Philips Hue and RoundPie work together?
To get the integration up and running, you need to find out your Philips Hue IP and API key.
How to find the Hue bridge IP address?
One of the greatest instructions is here:
- Log into meethue.com and bring up the "My Settings" page.
- Select "My bridge", then click the "Show me more" link.
- Your bridge's IP address is listed under Network Settings

OR
Use broker server discover process by visiting https://discovery.meethue.com or http://www.meethue.com/api/nupnp
OR
Download the official Philips hue app. Connect your phone to the network the hue bridge is on. Start the hue app. Push link connect to the bridge. Use the app to find the bridge and try controlling lights. All working — Go to the settings menu in the app. Go to My Bridge. Go to Network settings. Switch off the DHCP toggle. The ip address of the bridge will show. Note the ip address, then switch DHCP back on.
Now we have Philips Hue bridge IP.
Next step is to create API key to access our Philips Hue bridge.
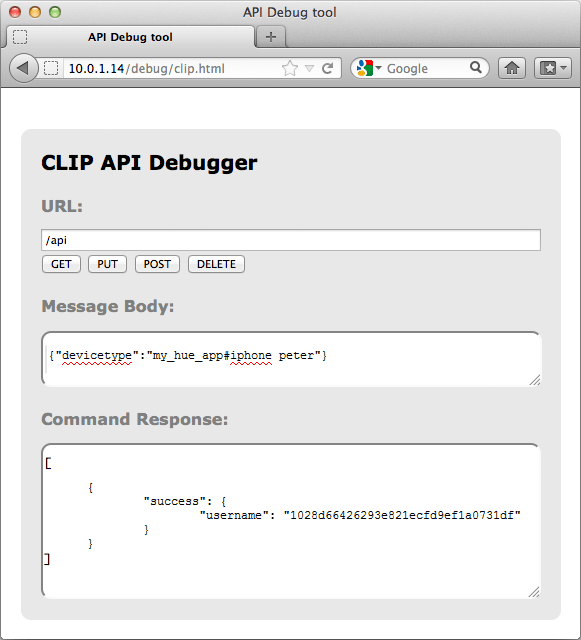
Open your browser and go to the API debugger:
http://<bridge ip address>/debug/clip.html
You'll see the following screen:

Use message body
{"devicetype":"my_hue_app#hue app"}.
Press the button on your bridge and now click the POST button on the debugger.
You should see a response like:
[
    {
        "success": {
            "username": "7fbb0cd252f3787c2b81892b03d8a9"
        }
    }
]
username is the token you can use to control your lights.
So, now we have all what we need: Our Philips Hue bridge IP and API Key. Let’s configure our RoundPie Desktop App integration.
Microsoft Windows.
Open Windows RoundPie Desktop app, click to burger menu and find app's Settings. Then switch to Advanced tab and scroll down to the PowerShell section.
This is our base windows (shell) snippet:
Invoke-WebRequest -Method put -Uri http://<your-hue-bridge-IP>/api/<apikey>/lights/<lamp-number>/state -Body '{"on": true,"bri": 254,"hue": 7165,"sat": 225}'
Replace the following parameters you have and want to change:
- your-hue-bridge-IP, apikey by the ones you got before;
- lamp-number depending on your setup system (we believe we know what's your lamp number 1 and what's your lamp number 2?)
- other parameters (on/off, brightness, hue, and saturation) for Timer Start and Timer End blocks of RoundPie App Powershell section.
Apple macOS:
Open Mac RoundPie Desktop app (if you're using App Store version, switch to our website's one, you can download it for free from our website's page).
Click to burger menu and find app's Settings. Then switch to Advanced tab and scroll down to the AppleScript section.
This is our base snippet you can use:
do shell script "curl --request PUT --data '{\"on\":false, \"bri\": 255, \"hue\": 7165,\"sat\": 225}' http://<your-hue-bridge-IP>/api/<apikey>/lights/<lamp-number>/state"
Replace the following parameters you have and want to change:
- your-hue-bridge-IP, apikey by the ones you got before;
- lamp-number depending on your setup system (we believe we know what's your lamp number 1 and what's your lamp number 2?)
- other parameters (on/off, brightness, hue, and saturation) for Timer Start and Timer End blocks of RoundPie App AppleScript section.
That's it.
Click the RoundPie App logo in the left top corner, select a task and start your timer.

Ultimate Plan + Free trial
RoundPie and Philips Hue integration is based on PowerShell / AppleScript integration. These integrations are included in our Ultimate Plan with a Free Trial available with no strings attached. So feel free to try it out and see how it works for you!
Feel free to share your experience. Comments, tweets are always welcome.
What would you like to know and what would be the best way to share this information to you? What is the best tips & tricks, what workaround do you use? We'd really appreciate your insight on these ones to make our integrations better, more productive and much more efficient. Comments, tweets are always welcome.